I've done it! Upgraded my blog from Blogger to the WordPress site I've had for years, jumping 20 years into the future. Check out https://calafell.me/ and delete your shortcut to https://dynamicsax365trix.blogspot.com/.
Cheers!
Saturday, September 29, 2018
Sunday, September 16, 2018
Latency Testing for Dynamics 365 for Finance and Operations
Recently I went on a journey testing the latency of the Azure dark fiber backbone between data centers. This is crucial for a global Dynamics 365 Finance and Operations ("FinOps") implementation. In general bandwidth can be purchased but latency is hard to influence.
There are some resources online which provide latency numbers which seem to hold somewhat accurate still, but I wanted the latest latency numbers to use in my analysis. Each end-user location could determine which Azure data center was closest by using Azurespeed.com. Next I referenced a Microsoft blog to test latency between Azure data centers, so that I could prove the benefit of Azure Express Routes to the nearest/lowest-latency data center, then routing traffic to the FinOps instance would be the best approach. Here is what I did-
1. Created a vNet with two subnets in the region to host FinOps
10.20.1.0/24 vNet
10.20.1.0/26 Resources subnet
10.20.1.192/26 Gateway subnet
2. Created a VPN Gateway in the region to host FinOps - this takes a long time to deploy
10.20.n.0/26 Resources subnet
10.20.n.192/26 Gateway subnet
4. Created VPN Gateways in every destination regions
5. Created VPN connections - connections representing both directions must be created, both origin to destination and destination to origin.
6. Created virtual machines (VM) - Deployed the first one manually then created a template for the other regions to make for a faster deployment which could guarantee consistency.
7. Configured the Network Security Groups on all virtual machines
Limited RDP traffic to my IP and inter-region IPs {MyIP},10.200.0.0/16
Allowed PsPing traffic on port 81
8. Did testing using psping (iperf is an alternative)
On the origin: psping -f -s 10.20.1.4:81
On the destination: psping -l 8k -n 1000 -f 10.20.1.4:81
Example output from PsPing from Korea Central to East US2:

Latency has always been a critical component of any AX or D365FO implementation. Now that it is hosted by Microsoft we have several tools to test network performance before we deploy.
There are some resources online which provide latency numbers which seem to hold somewhat accurate still, but I wanted the latest latency numbers to use in my analysis. Each end-user location could determine which Azure data center was closest by using Azurespeed.com. Next I referenced a Microsoft blog to test latency between Azure data centers, so that I could prove the benefit of Azure Express Routes to the nearest/lowest-latency data center, then routing traffic to the FinOps instance would be the best approach. Here is what I did-
1. Created a vNet with two subnets in the region to host FinOps
10.20.1.0/24 vNet
10.20.1.0/26 Resources subnet
10.20.1.192/26 Gateway subnet
2. Created a VPN Gateway in the region to host FinOps - this takes a long time to deploy
3. Created vNets with two subnets in every destination region each region with a different number for variable 'n.'
10.20.n.0/24 vNet10.20.n.0/26 Resources subnet
10.20.n.192/26 Gateway subnet
4. Created VPN Gateways in every destination regions
5. Created VPN connections - connections representing both directions must be created, both origin to destination and destination to origin.
6. Created virtual machines (VM) - Deployed the first one manually then created a template for the other regions to make for a faster deployment which could guarantee consistency.
7. Configured the Network Security Groups on all virtual machines
Limited RDP traffic to my IP and inter-region IPs {MyIP},10.200.0.0/16
Allowed PsPing traffic on port 81
8. Did testing using psping (iperf is an alternative)
On the origin: psping -f -s 10.20.1.4:81
On the destination: psping -l 8k -n 1000 -f 10.20.1.4:81
Example output from PsPing from Korea Central to East US2:

Latency has always been a critical component of any AX or D365FO implementation. Now that it is hosted by Microsoft we have several tools to test network performance before we deploy.
Tuesday, September 11, 2018
Debug AIF Document Service within AX
Sometimes it is a pain to create a .NET application and attach a debugger to the AOS service just to diagnose a problem with an AIF service. It is possible to do all debugging inside of AX. This example is for a standard AIF document service, however, you can also do the same for a custom service in a way which is even easier.
As a prerequisite, the inbound port must have document version logging enabled. If not, deactivate it, enable logging, then activate it.
1. Find the exception and its message ID
/System administration/Periodic/Services and Application Integration Framework/Exceptions
Save the Message ID from this screen.
2. Get XML from AIF history
/System administration/Periodic/Services and Application Integration Framework/History
Filter on the Message ID, click "Document Logs" then save the document.

3. Modify XML to remove the entity key list, and keep the key because it is needed in the job.

4. Create a job for debugging
static void testAifXml(Args _args)
{
#file
AifEntityKey aifEntityKey;
AxdSalesOrder axdSalesOrder;
FileName fileName = @"\\a\b\c\4BA32F0A-F7FC-46FD-8DB0-ABB04A6F4ECE.xml";
Map map;
XmlDocument xmlDocument;
map = new Map(Types::Integer, Types::Container);
map.insert(fieldNum(SalesTable, SalesId), ['SO000037']);
aifEntityKey = new AifEntityKey();
aifEntityKey.parmTableId(tableNum(SalesTable));
aifEntityKey.parmKeyDataMap(map);
new FileIoPermission(fileName, #io_read).assert();
xmlDocument = XmlDocument::newFile(fileName);
CodeAccessPermission::revertAssert();
axdSalesOrder = new AxdSalesOrder();
axdSalesOrder.update(aifEntityKey, xmlDocument.xml(), new AifEndPointActionPolicyInfo(), new AifConstraintList());
info("Done");
}
Thursday, September 6, 2018
Validate AX DLL Versions on Multiple Machines
List the versions for all DLLs which will load in AX using the Get-AxDllVersions. Download the PowerShell script. Run this script against all machines running the AX client (RDP/Citrix/end-user) and servers. This is useful to confirm that all DLLs deployed match in file version.
Example 1: Export DLL Versions for Local Machine
.\Get-AxDllVersions.ps1
Example single value:
ComputerName : Server1
FileVersion : 6.3.5000.3084
ProductVersion : 6.3.5000.3084
OriginalName : Microsoft.Dynamics.Retail.TestConnector.dll
FilePath : \DAXDEVMCA1\c$\Program Files\Microsoft Dynamics AX\60\Server\Server1\bin\Connectors
FileDescription :
ProductName : Microsoft Dynamics AX Status : Success
Example 2: Retrieving Multiple Server DLL Versions
.\Get-AxDllVersions.ps1 -ComputerName "Server1","Server2"
Example 3: Export Multiple Server DLL Versions to CSV
.\Get-AxDllVersions.ps1 -ComputerName (Get-Content "ComputerList.txt") | Export-csv "c:\temp\AX_DLL_Versions.csv" -NotypeInformation
Requirements
The script must be run as an account having Administrator access all computers. The script will skip any offline/inaccessible computers.
Monday, August 20, 2018
Unable to Enable Warehouse Management II License Key
In AX 2012 R3 CU12, after disabling Trade > Warehouse and Transportation Management the Warehouse Management II license cannot be enabled in License information.

The fix was:
1. Kick out other users
2. Keep AOS online and AX open
3. Backup business data SQL database
4. Run this SQL on business database: DELETE SysConfig WHERE ConfigType IN (0, 1, 2)
5. Open License information in AX
6. Apply Microsoft AX license key, no DB sync
7. Apply any partner licenses, no DB sync
8. Check that Warehouse Management II is check-marked in the license information
8. DB sync
9. Axbuild.exe
10. Full CIL
“You can not add this license code because the following
required license codes have not been entered: Warehouse management I”

1. Kick out other users
2. Keep AOS online and AX open
3. Backup business data SQL database
4. Run this SQL on business database: DELETE SysConfig WHERE ConfigType IN (0, 1, 2)
5. Open License information in AX
6. Apply Microsoft AX license key, no DB sync
7. Apply any partner licenses, no DB sync
8. Check that Warehouse Management II is check-marked in the license information
8. DB sync
9. Axbuild.exe
10. Full CIL
Saturday, July 28, 2018
Data Migration: Combining 105 Excel Files in 3 Minutes
I needed to import multiple Excel files into AX; all of them had a very similar format with the same columns. Python to the rescue. Ever since Build 2018 I've been using Visual Studio Code and enjoyed every moment of it, as I build Python scripts to assist me with anything I can think of. I highly suggest that tool, and the Cobalt2 theme, for increased productivity and debugging- as a gateway drug to Python addiction(!).
This script will combine all of the files within a directory into a file, Combined.xls. Install Python 3 then install xlwt and xlrd using pip. The os module is part of the main Python installation already. Create a python file (*.py) with the following code. Then change the settings to suit your situation as well as the logic for skipping of the header record.
import os
import xlwt
import xlrd
# Settings
directory_path = r'~\Data Migration\RouteOpr'
combined_fullpath = r'~\Data Migration\RouteOpr\Combined.xls'
path_sep = '\\'
import_sheet_name = 'Template'
num_files_to_combine = 99999
print('Combining files in {}'.format(directory_path))
# Create workbook
wkbk = xlwt.Workbook()
outsheet = wkbk.add_sheet('Combined')
# Go through each file and add it to the combined file
outrow_idx = 0
file_num = 0
num_rows_this_file = 0
for root, dirs, files in os.walk(directory_path):
for filename in files:
file_num += 1
if file_num > num_files_to_combine:
break
print('...{}'.format(filename),end='',flush=True)
f = root + path_sep + filename
num_rows_this_file = 0
try:
insheet = xlrd.open_workbook(f).sheet_by_name('Template')
except xlrd.XLRDError as e:
print('ERROR (skipping file): ',end='')
print(e)
continue
for row_idx in range(insheet.nrows):
num_rows_this_file += 1
outrow_idx += 1
# Skip header rows after the first file
if file_num > 1 and row_idx < 10 and (insheet.cell_value(row_idx, 0) in ('AccError','Accumulated') or insheet.cell_value(row_idx, 1) == 'if configured Item will be required.'): # Modify this line to skip any header records
outrow_idx -= 1
continue
for col_idx in range(insheet.ncols):
outsheet.write(outrow_idx, col_idx, insheet.cell_value(row_idx, col_idx))
outsheet.write(outrow_idx, insheet.ncols, filename)
print(' {:,} rows'.format(num_rows_this_file))
#save the file
wkbk.save(combined_fullpath)
print('Saved combined file to {}'.format(combined_fullpath))
print('Files combined successfully')
The output will look like -
Combining files in XXXX
Migration\RouteOpr\Test_2018-07-19
...Route Operations Template A.xlsx 298 rows
...Route operations template B.xlsx 282 rows
...Route operations template C.xlsx 173 rows
...Route operations template D.xlsx 1,874 rows
{...}
...Route operations template CD.xlsx 36 rows
Saved combined file to XXXXX\Data Migration\RouteOpr\Test_2018-07-19\Combined.xls
Files
combined successfully
Cheers!
Wednesday, June 27, 2018
The Product variants form can only be opened for a product master
When right-clicking > View Details on a Variant number you may receive the following message "The Product variants form can only be opened for a product master."
Call Stack
Problem
Call Stack
[c] \Data Dictionary\Tables\EcoResProductMaster\Methods\getProductMasterFromCaller 34
[c] \Classes\EcoResProductVariantsCompanyHelper\newFromFormRun 18
[c] \Classes\EcoResProductVariantsFormHelper\newFromFormRun 21
[c] \Forms\EcoResProductVariantsPerCompany\Methods\productVariantsFormHelper 5
[c] \Forms\EcoResProductVariantsPerCompany\Methods\init 3
[c] \Classes\SysSetupFormRun\init 5
[c] \Classes\FormDataObject\jumpRef
[c] \Classes\FormStringControl\jumpRef
[c] \Classes\FormRun\Task
[c] \Classes\SysSetupFormRun\Task 48
[c] \Classes\FormStringControl\Context
Problem
The method \Data Dictionary\Tables\EcoResProductMaster.getProductMasterFromCaller() handles EcoResDistinctProductVariant but not InventDimCombination.
Solution
Add the following code to \Data Dictionary\Tables\EcoResProductMaster.getProductMasterFromCaller()
//coming from the Go to Main Table
if (_args.lookupTable() == tableNum(InventDimCombination))
{
ecoResDistinctProductVariantCaller = EcoResDistinctProductVariant::find(InventDimCombination::findVariantId(_args.lookupValue()).DistinctProductVariant);
callerRecord = EcoResProductMaster::find(ecoResDistinctProductVariantCaller.ProductMaster);
}
Friday, June 8, 2018
Generating Random Numbers and Dates (AX 2012)
The Random class creates random integer values. Although the range of an int (32 bit) is: [-2,147,483,647 : 2,147,483,647], Random.nextInt() generates values from 0 to 32,767, which is an unsigned 16-bit integer. Let's run the Random class to validate the randomness.
The results of generating 1,048,574 random numbers represented as a histogram:

The RandomGenerate class enables you to specify a range for the random numbers. Let's test RandomGenerate.randomInt() method.
Results of generating 1,048,574 random numbers between 0 and 3,000 represented as a histogram:

dateMax() is 12/31/2154 or 93136 as an integer
12/30/2154 is 93135 as an integer, so dates are stored as the number of days since January first of 1900. So we can generate a random date by generating numbers between 0 and 93,136.
Results of generating 1,048,574 random numbers between 0 and 3,000 represented as a histogram:

There isn't an obvious issue. :) I checked and as far as I could tell it did not generate the same numbers over and over, and it can accept a seed:
randomGenerate = RandomGenerate::construct();
randomGenerate.parmSeed(new Random().nextInt());
Keep in mind that the compiler needs to you first assign the output of the function to an integer before casting it to a date:
myInt = randomGen.randomInt(0, 93136);
myDate = dateNull() + myInt; // Convert to date
As long as you are not generating random numbers for cryptography, this implementation should satisfy the requirement. As an alternative, call to the .NET class System.Random or another library.
The results of generating 1,048,574 random numbers represented as a histogram:

The RandomGenerate class enables you to specify a range for the random numbers. Let's test RandomGenerate.randomInt() method.
Results of generating 1,048,574 random numbers between 0 and 3,000 represented as a histogram:
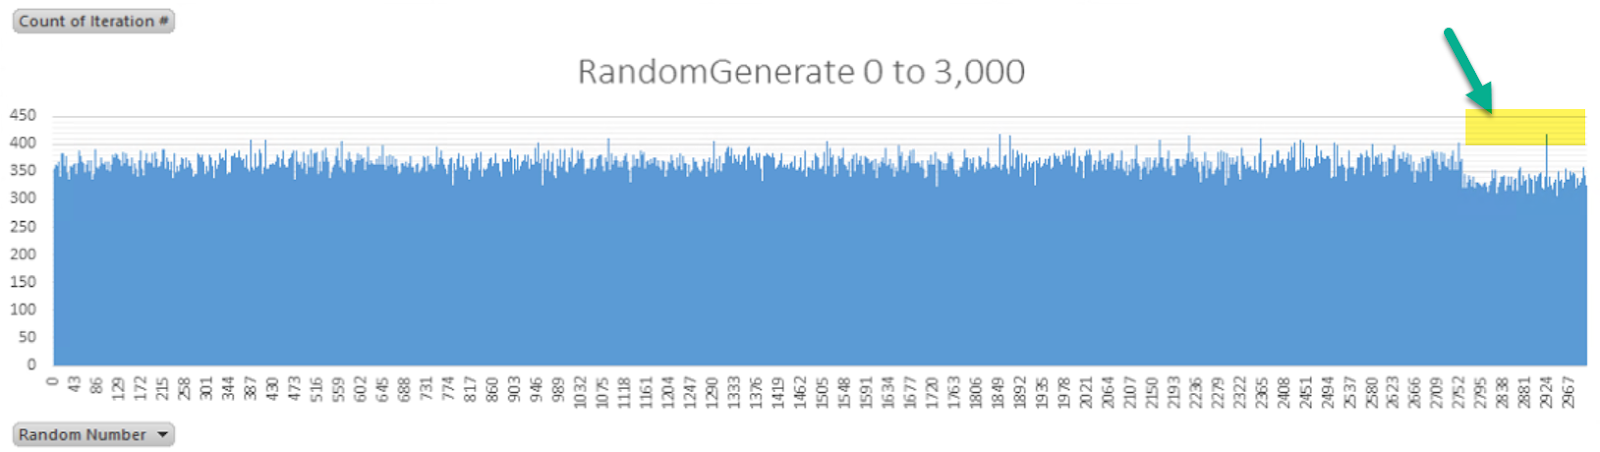
There is an interesting drop off close to the 3,000 mark.
Generating a random date
dateNull() is 1/1/1900 or 0 as an integerdateMax() is 12/31/2154 or 93136 as an integer
12/30/2154 is 93135 as an integer, so dates are stored as the number of days since January first of 1900. So we can generate a random date by generating numbers between 0 and 93,136.
Results of generating 1,048,574 random numbers between 0 and 3,000 represented as a histogram:

There isn't an obvious issue. :) I checked and as far as I could tell it did not generate the same numbers over and over, and it can accept a seed:
randomGenerate = RandomGenerate::construct();
randomGenerate.parmSeed(new Random().nextInt());
Keep in mind that the compiler needs to you first assign the output of the function to an integer before casting it to a date:
myInt = randomGen.randomInt(0, 93136);
myDate = dateNull() + myInt; // Convert to date
As long as you are not generating random numbers for cryptography, this implementation should satisfy the requirement. As an alternative, call to the .NET class System.Random or another library.
Sunday, April 1, 2018
Logoff Disconnected Remote Desktop Sessions using PowerShell
AX 2012 users continue to appear active in AX although they have disconnected from their RDP session. You can manually open Task Manager on each RDP server and logoff users who have disconnected. Alternatively, save the following commands as a ps1 file and run it against all RDP servers before checking the Online Users in AX to see who is using AX.
$serverName = "localhost"
$sessions = qwinsta /server $serverName | ?{ $_ -notmatch '^ SESSIONNAME' } | %{
$item = "" | Select "Active", "SessionName", "Username", "Id", "State", "Type", "Device"
$item.SessionName = $_.Substring(1,18).Trim()
$item.Username = $_.Substring(19,20).Trim()
$item.Id = $_.Substring(39,9).Trim()
$item.State = $_.Substring(48,8).Trim()
$item.Type = $_.Substring(56,12).Trim()
$item
}
foreach ($session in $sessions) {
if ($session.Username -ne "" -or $session.Username.Length -gt 1) {
if ($session.State -eq "Disc") {
Write-Host ("Logged off {0}" -f $session.Username)
logoff /server $serverName $session.Id
}
}
}
Tuesday, March 20, 2018
Installing Active Directory Part 2 - Dynamics 365 for Finance and Operations On-Premise at Home - 05
In the prior post we created the primary domain controller. In this article we will configure Active Directory and add a second domain controller.
In a later post we'll set up ADFS and Azure Active Directory (AAD)- both of which are required for Dynamics 365 for Finance and Operations.
26. Right-click your domain name > New > Organization Unit

27. Type in "Lab" for the name and accept the defaults for the other fields.
28. Create two organization units (OUs) underneath, one for computers, another for users.
29. Create a user under the Users OU.

30. Fill out first name, last name, user SamAccount, and passwords.

31. Add the user to the "Domain Administrators" group on the "Member Of" group.

32. (Optional) This is a test domain, so you can change the account to not expire the password (not recommended in real environments) and prevent the account from accidental deletion.


34. Join the second virtual machine to the domain (requires a restart).

35. The installation of the role is the same, however we will configure/promote the AD server differently. Complete steps 17 and 18 above on the second VM.
36. In server Manager, click on the pending notifications and then "Promote this server to a domain controller"
 37. We will use the "Add a domain controller to an existing domain" option, using the credentials of the user created earlier.

38. Specify the same Directory Services Restore Mode (DSRM) password as used on the other server.

39. Accept the default settings for the rest of the wizard and "Updating DNS delegation" is not necessary. Click Install.

40. The server should reboot. Finally, kick off Windows updates, as per the usual.
Congratulations we now have a two-DC Active Directory domain!
In a later post we'll set up ADFS and Azure Active Directory (AAD)- both of which are required for Dynamics 365 for Finance and Operations.
Add an OU and Domain Admin Account
25. Open the Active Directory Administrative Center26. Right-click your domain name > New > Organization Unit

27. Type in "Lab" for the name and accept the defaults for the other fields.
28. Create two organization units (OUs) underneath, one for computers, another for users.
29. Create a user under the Users OU.

30. Fill out first name, last name, user SamAccount, and passwords.

31. Add the user to the "Domain Administrators" group on the "Member Of" group.

32. (Optional) This is a test domain, so you can change the account to not expire the password (not recommended in real environments) and prevent the account from accidental deletion.

Add the second VM to the existing domain
33. Perform steps 10 through 13 on the second VM, then set a static IP with the DNS server referencing the first virtual machine. This is necessary because Active Directory creates SRV DNS records which need to be referenced to join computers to the domain.
34. Join the second virtual machine to the domain (requires a restart).

35. The installation of the role is the same, however we will configure/promote the AD server differently. Complete steps 17 and 18 above on the second VM.
36. In server Manager, click on the pending notifications and then "Promote this server to a domain controller"


38. Specify the same Directory Services Restore Mode (DSRM) password as used on the other server.

39. Accept the default settings for the rest of the wizard and "Updating DNS delegation" is not necessary. Click Install.

40. The server should reboot. Finally, kick off Windows updates, as per the usual.
Congratulations we now have a two-DC Active Directory domain!
Saturday, March 17, 2018
Installing Active Directory Part 1 - Dynamics 365 for Finance and Operations On-Premise at Home - 04
One of the 'shared service' environment requirements for Dynamics 365 for Finance and Operations is an Active Directory domain. There should never be just one Active Directory server, so we'll create two Windows Server 2016 virtual machines. AX needs an Active Directory functional version of at least 2012 R2. The requirements when using Windows Server 2016 are 1 vCPU and 2GB of RAM (although I allocate 4GB and use dynamic memory).
In a later post we'll set up ADFS and Azure Active Directory (AAD).
2. Click "New virtual machine"
3. Specify a name, i.e. LabDC01

4. Select "Generation 2" for the generation of the virtual machine
5. Specify 4096 MB of dynamic memory

6. Create a new virtual hard disk. I specified 80 GB to be save, as the disk will only take the space it requires. After I completed all the steps here, including Windows Updates, the disks were taking less than 20GB.
7. Attach an iso file of Windows Server 2016 as your option for installation.
8. Click finish

9. Start the VM
Do the same for the second VM.

11. After installation, change computer name, i.e. LabDC01.

12. Disable the firewall (this is an internal server which can be scrapped if needed).

13. Enable RDP connections

14. Give it a static IP- this is required for setting up these servers to host DNS. Choose an IP address which will be reserved for this server. Make sure that you do not give this IP address to another device later. The DNS setting in the screenshot is the upstream DNS, which in my case is a local pfSense firewall/server.

15. Turn off IE Enhanced Security
16. Restart

18. Chose "Role based or feature-based installation" and the current local server, check mark both "Active Directory Domain Services" and "DNS Server." For each, a popup will ask if you want to add the features required for that service, click "Add features" in both occasions.


19. After installation, click the warning icon and then "Promote this server to a domain controller" wizard.


20. Click "Add a new forest" and give it a good domain name- for this purpose we'll use two words separated by a period.

21. Type in a password for the directory services restore mode. The rest of the options are the defaults.

22. Accept the default paths and click "Install."
23. The server will automatically reboot.

24. Finally go ahead and kick off Windows Updates, as per the usual.
We have created the primary domain controller and in the next post we'll cover configuration and adding a second domain controller virtual machine.
In a later post we'll set up ADFS and Azure Active Directory (AAD).
Creation of the Hyper-V VM
1. Open Hyper-V Manager2. Click "New virtual machine"
3. Specify a name, i.e. LabDC01

4. Select "Generation 2" for the generation of the virtual machine
5. Specify 4096 MB of dynamic memory

6. Create a new virtual hard disk. I specified 80 GB to be save, as the disk will only take the space it requires. After I completed all the steps here, including Windows Updates, the disks were taking less than 20GB.
7. Attach an iso file of Windows Server 2016 as your option for installation.
8. Click finish

9. Start the VM
Do the same for the second VM.
Setting up the first Domain Controller
10. Go through the installation of Windows Server 2016. There are very few questions, however, I did chose to install the Desktop Experience. For the key, I chose to install without a key to see if the AVMA feature of Hyper-V works.
11. After installation, change computer name, i.e. LabDC01.

12. Disable the firewall (this is an internal server which can be scrapped if needed).

13. Enable RDP connections

14. Give it a static IP- this is required for setting up these servers to host DNS. Choose an IP address which will be reserved for this server. Make sure that you do not give this IP address to another device later. The DNS setting in the screenshot is the upstream DNS, which in my case is a local pfSense firewall/server.

15. Turn off IE Enhanced Security
16. Restart
Add the Active Directory Domain Services and DNS Server roles
17. In the server manager that automatically opens when the server restarts, click "Manage > Add Roles and Features"
18. Chose "Role based or feature-based installation" and the current local server, check mark both "Active Directory Domain Services" and "DNS Server." For each, a popup will ask if you want to add the features required for that service, click "Add features" in both occasions.


Promote this server to a domain controller
19. After installation, click the warning icon and then "Promote this server to a domain controller" wizard.


20. Click "Add a new forest" and give it a good domain name- for this purpose we'll use two words separated by a period.

21. Type in a password for the directory services restore mode. The rest of the options are the defaults.

22. Accept the default paths and click "Install."
23. The server will automatically reboot.

24. Finally go ahead and kick off Windows Updates, as per the usual.
We have created the primary domain controller and in the next post we'll cover configuration and adding a second domain controller virtual machine.
Wednesday, March 14, 2018
Attaching an iSCI LUN to Windows Server 2016 - Dynamics 365 for Finance and Operations On-Premise at Home - 03
Regardless of the NAS device you may be using, the following steps can attach iSCI storage to your server for VM storage. These are the steps I took:
2. Open the iSCI Initiator program
3. Type in the static IP address of your NAS

4. Click "Quick Connect"

5. Click "Done." The virtual disk name should appear "Connected."
6. Click the "Volumes and Devices" tab
7. Click "Auto Configure" button. This should add your volume to the list

8. Start > Run compmgmt.msc
9. Click on Storage > Disk Management. The new disk (LUN) should appear offline.
10. Right click and choose "Online"

11. Right click and choose "Initialize Disk"

12. Choose to create a GPT (GUID Partition Table) for the disk.

13. Right click the unallocated area and choose "New Simple Volume..."

14. Format the volume as NTFS, 64K, give it a label, and quick format.

16. Click on your server
17. Click "Hyper-V Settings"
18. Change the "Virtual Hard Disks" setting to a subfolder of your new drive.

19. Change the "Virtual Machines" folder to your new drive.

We are now ready to create virtual machines!!
(Optional) Download AIDA64 or IOmeter and run a disk test.

Reference: How to use iSCSI Targets on a Windows Server
Attach an iSCI LUN to Windows Server 2016
1. Log into the Hyper-V server2. Open the iSCI Initiator program
3. Type in the static IP address of your NAS

4. Click "Quick Connect"

5. Click "Done." The virtual disk name should appear "Connected."
6. Click the "Volumes and Devices" tab
7. Click "Auto Configure" button. This should add your volume to the list

8. Start > Run compmgmt.msc
9. Click on Storage > Disk Management. The new disk (LUN) should appear offline.
10. Right click and choose "Online"

11. Right click and choose "Initialize Disk"

12. Choose to create a GPT (GUID Partition Table) for the disk.

13. Right click the unallocated area and choose "New Simple Volume..."

14. Format the volume as NTFS, 64K, give it a label, and quick format.

Change Default Hyper-V VM Folders
15. Open Hyper-V Manager16. Click on your server
17. Click "Hyper-V Settings"
18. Change the "Virtual Hard Disks" setting to a subfolder of your new drive.

19. Change the "Virtual Machines" folder to your new drive.

We are now ready to create virtual machines!!
(Optional) Download AIDA64 or IOmeter and run a disk test.

Reference: How to use iSCSI Targets on a Windows Server
Sunday, March 11, 2018
Setting up iSCSI with Synology - Dynamics 365 for Finance and Operations On-Premise at Home - 02
Previous Post: Windows and Hyper-V Installation - Dynamics 365 for Finance and Operations On-Premise at Home - 01
To support the number of VMs and possible environments I want to host I will be leveraging a network attached storage (NAS) device to store data. My network backbone is a full gigabit running on CAT6 plenum-rated cable. The disks and more details will be explained in detail when I do some benchmarking.

Here are the steps I took:
1. Log into the DSM interface
2. Open the Storage Manager 'app'
3. Click iSCSI LUN
4. Click "Create" button
5. Click "Next", thereby accepting a File-Level LUN

6. Change the settings to Advanced LUN, 4KB, and the appropriate capacity.
7. Click Next

7. Set your own IQN
8. Click next
 9. Click Apply
You now have a LUN available to your network which we will connect to our Hyper-V server.
Reference: How to use the iSCSI Target service on Synology NAS
To support the number of VMs and possible environments I want to host I will be leveraging a network attached storage (NAS) device to store data. My network backbone is a full gigabit running on CAT6 plenum-rated cable. The disks and more details will be explained in detail when I do some benchmarking.
iSCSI Setup on Synology NAS
I own a Synology Network Attached Storage (NAS) device which can support recording surveillance, running VMs, private cloud drive, and many more features. The Synology device is more resilient than the used hard drives in the server I recently bought. So I created a one terabyte LUN for storing VM configuration and drives. If the server's hard drives crash, I can either purchase a replacement drive and rebuild the RAID array or reinstall Windows with the drives left. Either way I will be able to reattach the virtual machine files from the Synology NAS and run them with little pain. Additionally it is 'thin provisioned' meaning the storage is not taken until it is used by a VM.
Here are the steps I took:
1. Log into the DSM interface
2. Open the Storage Manager 'app'
3. Click iSCSI LUN
4. Click "Create" button
5. Click "Next", thereby accepting a File-Level LUN

6. Change the settings to Advanced LUN, 4KB, and the appropriate capacity.
7. Click Next

7. Set your own IQN
8. Click next

You now have a LUN available to your network which we will connect to our Hyper-V server.
Reference: How to use the iSCSI Target service on Synology NAS
Subscribe to:
Posts (Atom)