Friday, March 9, 2018

Windows and Hyper-V Installation - Dynamics 365 for Finance and Operations On-Premise at Home - 01

Previous Post: Setting up Dynamics 365 for Finance and Operations- on-premise...at home!

Setting up the Server

The server arrived, it is time to get rolling!  I first jumped into the BIOS.  It is easier and better to configure things before the operating system is installed.  First, I set up four SAS 300GB 10k drives in a RAID 5.  RAID 6 has better redundancy yet I do not have the hard drives to support it.  I enabled virtualization technology and execution prevention in the BIOS.  HP servers come with Integrated Lights Out (ILO) so I configured the IP address and admin user.


Installing Windows Server 2016-  I first downloaded Datacenter edition using my MSDN subscription- Automatic Virtual Machine Activation” (AVMA) should automatically activate the virtual machines it hosts.  I created a bootable USB drive using the free Rufus tool.  The installation was straightforward.  Once Windows Server 2016 was installed, I went straight to windows updates, which had to run several times until all of the cumulative updates installed correctly.  Then I renamed the computer and I made note of the MAC address so I could set up a static DHCP entry in my router.

Installing Hyper-V

  1. Open Server Manager
  2. Click Local Server
  3. Click Manage > Add Roles and Features
  4. Next
  5. Role-Based
  6. Select the current server
  7. Check mark "Hyper-V," click ok when it asks to add the management tools
  8. Next
  9. Next
  10. Finish
  11. Reboot

Stay tuned for iSCSI setup then Dynamics 365 for Finance and Operations, Enterprise Edition on-premise installation....

Tuesday, March 6, 2018

Setting up Dynamics 365 for Finance and Operations- on-premise...at home!

In order to build some of the automation tools and test configurations I set down the path of purchasing a server.  There are many servers available with decent specifications, still under warranty, and with good performance.  The better deals are enterprise hardware being replaced (used)- look at Dell PowerEdge and HP ProLiant hardware.  In contrast to a beefy gaming PC, these used enterprise servers are built to run 24x7 until they die, decade(s) later.

The older the hardware, the less efficient it is with power, and therefore the server produces more heat.  Living in a warm client, my office already is warmer by several degrees because of my office setup: two computers, three monitors, and peripherals.  You can reference Intel's Ark web site by putting in the processor number and it will tell you the wattage as well as the year that the processor was introduced.

I chose to go with a tower, HP ProLiant ML350 G6 Server, in the hopes that it will have better airflow and less noise.  It supports two hex-core processors (24 threads) and has 18 DIMM for memory (max 192GB).  The HP servers seem to be cheaper than the Dell, however there are reports of hypervisor issues with HP, so I'm crossing my fingers.  With the tower form factor, I have more flexibility for changing fans to reduce noise.

For Dynamics 365 for Finance and Operations, Enterprise Edition, keep in mind that:
I plan on pushing the minimum requirements, first to explore how performance changes with different configurations and the usage on the server will be minimal.

Join me on this adventure, including setting up the server, environment, LCS, and Dynamics installation.

Thursday, March 1, 2018

Converting Toodledo Tasks to Nozbe

Over the past ten years I have loved the Pocket Informant system of Getting Things Done (GTD) with Toodledo as the back end.  However, I found Nozbe - yes they've been around this whole time!  I wish I had known about them sooner!  So, I took my 150+ tasks from Toodledo and converted them into a format that Nozbe could import.

Check out the Python code to convert your data!

Interested in signing up?

Monday, February 5, 2018

AX 2012 Database Synchronization Warnings and Errors


After making a change to the data dictionary AX will synchronize to the SQL database.  If you have turned off configuration keys the window which pops up shows many warnings, most of which can be ignored every time.  How do you know which of the warnings should be reviewed?

Open SQL Server and run the following command.  It lists the warnings and errors in one consolidated grid and it ignores any configuration key warnings which can be disregarded.

select TableName,
       [Text],
       ID,
       ParentID,
       case MessageType
              when 0 then 'Header'
              when 1 then 'Warning'
              when 2 then 'Error'
              else Convert(nvarchar(5), MessageType)
       end as MessageType,
       SyncTable,
       WarningOK,
       [Sequence]
from SqlSyncInfo
where MessageType <> 0 -- remove headers
       and [Text] not like '%disabled%' -- disabled configuration keys can be ignored
order by MessageType, [Sequence]

Thursday, February 1, 2018

Performance Tweaks for AX2012 Demo VM

Open the VM Profile Manager within the VM, and change the default profile to "AX2012Minimum."


Look at VM profile to see what order it starts and stops things.  Take note and disable anything you do not plan on using.

Enable SQL Trace flags T4136 and T4199.


Disable SharePoint Search and Timer, and/or the services themselves (especially if you are not planning on using Enterprise Portal.


Friday, January 26, 2018

AX 2012 Demo VM on Parallels (OSx)

So I've got this iMac in my office with 24 GB of RAM so naturally, what am I doing with all that?  Well, I have hobbies and test my Linux scripts, firewalls, and even some CTF challenges within there.  Dynamics expert by day, and Linux enthusiast by night!  Anyways there always seems to be a reason to have a playground with AX demo data to use and reference.  This time, I wanted to set up AX 2012 CU13.  Here were my steps for setting this up on my iMac...yes, run an Microsoft ERP system on an Apple product.  Blow your mind!

After downloading the files from Microsoft, convert the files to a format that Parallels can import.  We use prl_convert executable within the Parallels application in OSx.  You will need to change directory into the application's directory and provide the path to the vhd file.
/Applications/Parallels\ Desktop.app/Contents/MacOS/prl_convert /Volumes/My\ Book/AX2012R3A\ 2/Virtual\ Hard\ Disks/AX2012R3A_OS.vhd

Do the same for the second hard drive file from Microsoft.


Create a new VM in Parallels: Name it whatever you like, no limit on resources, 2 vCPUs, 12196 MB memory (ideally 16GB), do not optimize for games, do not share file paths, do not share applications, do not share printers.  In other words, turn off the features which could take extra processing power.

Networking
Network 1 should be the default adapter

Network 2 (add one!) should be a Host-Only network

Hard Disks
Point to the hard disk files you converted earlier:

Make sure boot order starts with Hard Disk 1 then boot the system!

Configure the VM

Set a static IP address and DNS server on the adapter which has a 10.* IP address.


Add the following IP addresses as IP addresses on the other adapter:
  • 10.20.12.110
  • 10.20.12.111
  • 10.20.12.112
  • 10.20.12.113
  • 10.20.12.114
  • 10.20.12.120
  • 10.20.12.121

Then run iisreset or reboot the VM.

Edit hosts file, as needed.

Notes

It is no longer necessary to run C:\setnetworkip.bat
As reference, you can see how the VM would be set up in VirtualBox - https://www.youtube.com/watch?v=klV6qh211EI

Tuesday, January 23, 2018

Showing Bible Verse when PowerShell is Opened

Using the code created in a previous post in our PowerShell profile, we can have PowerShell display a random Bible quote whenever it is opened.

Steps

  1. Download PSBible-NET.psm1 from Github.
  2. Place the file in %UserProfile%\Documents\WindowsPowerShell\Modules.  You may need to create the folders if they do not already exist.
  3. Create "profile.ps1" in %UserProfile%\Documents\WindowsPowerShell\ and put this inside:

Import-Module "C:\Users\YOUR-USERNAME\Documents\WindowsPowerShell\Modules\PSBible-NET.psm1"

Get-BibleVerse -Random


Every time PowerShell is opened on your machine it will show a random Bible quote!


Keep in mind that the more commands you place inside the profile.ps1, the longer it will take to open PowerShell.

Sunday, January 21, 2018

Search the Internet for Bible References on a Topic

Scraping a Web Site for Bible References

Using the function from the prior post, we can leverage PowerShell to download a web page and parse it for us to find references to scripture.

$requestResult = Invoke-WebRequest -Uri "https://blogs.lcms.org/2018/loving-your-internet-neighbor" -DisableKeepAlive -UseBasicParsing -ErrorAction SilentlyContinue

if ($requestResult.StatusCode -eq 200)
{
    Get-BibleReferences $requestResult.Content | Format-Table -AutoSize
}


Output
Reference    Book    Chapter Verses From To
---------    ----    ------- ------ ---- --
1 Cor. 1:23  1 Cor   1       23     23     
1 PETER 3:15 1 PETER 3       15     15     
John+5:39    John    5       39     39     
John 5:39    John    5       39     39     
Luke 24:27   Luke    24      27     27      


Search the Internet for Bible References on a Topic

So let's take this a bit farther.  Let's say someone sends you an email wanting to know more about the Biblical position on, let's say, heaven and hell.  So you could fire up Google and spend the next half hour looking at the first ten posts on heaven and hell.  But really, we should take what scripture says first, then consider the opinions of others.  This lead me to wanting to look at only the Bible verses relating to Heaven or Hell.

I have built a function which will query Google, read the first page of results then download each of the results, scrape them for Bible references, and return not only the reference but also the Bible text in NET Bible format.  Although it takes about a minute to run it saves a bunch of time!

Get-BibleReferencesOnTopic "Lutheran Heaven Hell" | Select-Object Reference, Text | Export-Csv -Path "References.csv" -NoTypeInformation


Sample output (400 Bible References):


The code is available on Github!

Find Bible Verses using PowerShell

Using regular expressions and PowerShell we can create some code which will parse a Bible verse and then these values can be used in other ways.  In the function below I've used the .NET RegEx class to read Bible verses, which can be read from a text/CSV file into a variable.  It will find Bible verses within other text too.

function Get-BibleReferences {
    <#
        .SYNOPSIS
            Finds scripture references within the provided text.

        .DESCRIPTION
            Uses regular expressions to find references to the Bible and returns them as a set.

        .PARAMETER Text
            The text to parse for scripture references.

        .EXAMPLE
            PS C:\> Get-BibleReferences "Titus 3:1  Really any text can be here -- 1 Timothy 2:1-2 -" | Format-Table -AutoSize

            Reference       Book      Chapter Verses From To
            ---------       ----      ------- ------ ---- --
            Titus 3:1       Titus     3       1      1     
            1 Timothy 2:1-2 1 Timothy 2       1-2    1    2

        .NOTES
            Dag Calafell
            01.20.2018

        .LINK
            https://dynamicsax365trix.blogspot.com/
    #>
    [CmdletBinding(DefaultParameterSetName="Default")]
    param(
        [Parameter(ParameterSetName="Default",
            ValueFromPipelineByPropertyName=$true,
            Mandatory=$true,
            Position=0)]
        [ValidateNotNullOrEmpty()]
        [string[]]$text
    )

    $regex = new-object System.Text.RegularExpressions.Regex("(?(?:(?:[123]|I{1,3})\s*)?(?:[A-Z][a-zA-Z]+|Song of Songs|Song of Solomon)).?\s*(?1?[0-9]?[0-9]):\s*(?\d{1,3})(?:[,-]\s*(?\d{1,3}))*", [System.Text.RegularExpressions.RegexOptions]::MultiLine)
    $regexMatches = $regex.Matches($text)

    foreach ($match in $regexMatches)
    {
        $groups = $match.Groups
        $book         = $groups[1].Value
        $chapter      = $groups[2].Value
        $fromVerseNum = $groups[3].Value
        $toVerseNum   = $groups[4].Value

        $object = New-Object –TypeName PSObject
        $object | Add-Member –MemberType NoteProperty –Name Reference –Value $groups[0].Value
        $object | Add-Member –MemberType NoteProperty –Name Book –Value $book
        $object | Add-Member –MemberType NoteProperty –Name Chapter –Value $chapter

        if ($groups[4].Success)
        {
            $object | Add-Member –MemberType NoteProperty –Name Verses –Value ("{0}-{1}" -f $fromVerseNum, $toVerseNum)
            $object | Add-Member –MemberType NoteProperty –Name From –Value $fromVerseNum
            $object | Add-Member –MemberType NoteProperty –Name To –Value $toVerseNum
        }
        else
        {
            $object | Add-Member –MemberType NoteProperty –Name Verses –Value $fromVerseNum
            $object | Add-Member –MemberType NoteProperty –Name From –Value $fromVerseNum
            $object | Add-Member –MemberType NoteProperty –Name To –Value ""
        }

        # Return the info
        $object
    }
}

# Example
Get-BibleReferences "Titus 3:1  Really any text can be here -- 1 Timothy 2:1-2 -" | Format-Table -AutoSize

Output
Reference       Book      Chapter Verses From To
---------       ----      ------- ------ ---- --
Titus 3:1       Titus     3       1      1      
1 Timothy 2:1-2 1 Timothy 2       1-2    1    2 

This code is part of a larger script I'm working on to take a file of scripture references and return the full text to aid me in developing Bible studies.

Credit goes to RegexLib for the starting regex that I modified capture the data into groups.  Many times it is easier to find something to start with and extend it to what is desired.

Saturday, January 6, 2018

Allow WEMO Communication through your Firewall

The following instructions will enable your WEMO devices to communicate through your firewall without Upnp enabled.  Disabling Upnp is a best practice because otherwise any device inside your network would be able to open up any port to the outside world.  The screen shots will be from a pfSense 2.4 firewall but would apply to other firewalls as well.

There are two things your WEMO devices will require:

1. Ability to ping your gateway device (ICMP traffic)
2. Allow these Inbound and outbound TCP and UDP ports:
    - TCP 8080
    - TCP 8443
    - TCP/UDP 3475-3478
    - TCP/UDP 5223-5228
    - TCP/UDP 8445-8663

0. Preparatory work

To simplify the following steps, we are going to assign static IP addresses to our WEMO devices then create two firewall aliases.  A firewall alias is just a list of ports or IP addresses that can be referenced without typing them in over and over again.

Assign Static IPs for WEMO Devices

You'll need to log into your DHCP server, i.e. wireless router or firewall, to assign those devices static IP addresses.  Go ahead and write them down for future reference.

Firewall aliases:


  • WEMO_Devices - for this alias put in the static IP address for all of your WEMO devices.  A screen shot not provided for obvious reasons.
  • WEMO_Ports - for this alias put in the list and ranges of TCP & UDP ports which we will need to allow through the firewall


1. Ability to ping your gateway device

By default I disable pinging the gateway device, just because it is unnecessary traffic.  To enable this for the WEMO devices, create a rule allowing ICMP traffic from WEMO devices to hit the gateway IP address.


2. Enable Communication Over Specific Ports

Enable outbound communication

Allow communication on those ports from the WEMO devices to the internet.


Enable inbound communication

Allow communication on those ports from the internet only to WEMO devices.  This step shouldn't be necessary but I did it just in case.  I'm interested in feedback from my readers on this!

Security

By the time you are done doing the above, you'll wonder why you bought a WEMO device to begin with, but embrace the ease of use and probably give up (allow them in your network)- just isolate these devices so that they are unable to communicate with your other machines on the network (another firewall rule); so that, if a hacker was able to enter through one of the many ports above and compromise one of the WEMO devices, there would be nothing else accessible.  The worse thing that could happen is your lights or coffee maker turning on and off without your permission.

Friday, January 5, 2018

Create a VM network in Parallels with a Linux VM Firewall

Parallels Desktop has been a solid virtualization option for my iMac.  It enables easy sharing of folders and other advanced options I felt would be useful, i.e. seamless Windows programs.  For my latest adventure I wanted to test out some Linux firewall configurations without messing around with my physical environment.  So, I did the following to create a network where the linux firewall can serve both as a gateway and DHCP server.

Create the virtual network

  1. Open up Parallels Desktop Preferences
  2. Go to Network tab
  3. First take note of the IP address of the Shared network (for configuring your linux firewall)
  4. Then click the plus to create a new "Host-Only" network
  5. Uncheck "Connect Mac to this network"
  6. Uncheck "Enable IPv4 DHCP"
  7. Uncheck "Enable IPv6 DHCP"

FYI: The IP addresses shown will not be used because the linux firewall will respond to DHCP requests.

Configure the linux firewall

Set up two network interfaces on the VM before installing your favorite linux firewall, i.e. pfSense, Untangle, CentOS, or Sophos UTM.
  1. Open the configuration for your new VM
  2. Go to Hardware tab
  3. Configure Network 1 to have a source of "Default Adapter."  That network will have a connection regardless of whether your iMac connects via wireless or wired.
  4. Create a new network interface
  5. Select the "Host-Only #2" network we created in the prior section
    Make a note of the MAC address for this network for when you configure your firewall
  6. Now boot and install your linux firewall


Thursday, December 21, 2017

Comparing BOMs in AX

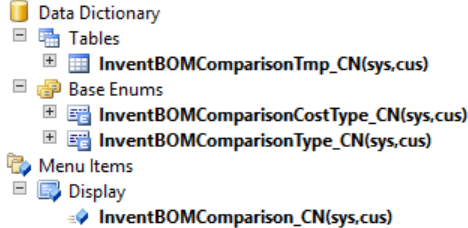
Bills of material in AX 2012 can be effective dated, and this provides the ability to keep prior versions.  Now it has been several years and the question arises- what changed between versions?  There is a built-in way to compare BOMs from the same product, or even two different -perhaps related- products.  However, this functionality is hard-coded to be for China only.


In order to limit the performance impact I enable only the necessary configuration keys.  So whenever a specific report or functionality from another country could be useful, I prefer to remove the country code on those objects to allow them to be used by all countries.  This is a minor modification that does not take long, however still requires functional testing.

In this case, these four objects need to have the CountryCode property cleared.


Friday, December 15, 2017

Outlook Setup Wizard - Dynamics 365 for Finance and Operations

In Microsoft Dynamics 365 for Finance and Operations, you may want to connect your Office365 email to receive contacts, tasks, and appointments from the ERP.  To do so, navigate to Organization Administration > Setup > Office integration > Microsoft Outlook Setup Wizard.  When it asks for the Exchange Web Services URL use the following to connect to your Office365 email account:
https://smtp.office365.com/EWS/Exchange.asmx


Once that is set up, activities assigned to you in Common > Activities can synchronize with your Outlook client!

Monday, July 3, 2017

Unable to Configure Report for PrecisionForms - Record Already Exists

Symptom:
Cannot create a record in Delivery destinations (BT_DPA_AOT_ReportDestinations). AOT object ID: 13, 2.
The record already exists.


Solution:
The unique index for the BottomLine tables is RecID.  Run the following SQL statement on your AX database.  Replace DATABASE with the name of your AX database.


IF OBJECT_ID('DATABASE.dbo.[BT_DPA_AOT_ReportDestinations]', 'U') IS NOT NULL
BEGIN
       UPDATE SystemSequences
       SET NEXTVAL = 1 + (SELECT MAX(RecID) FROM BT_DPA_AOT_ReportDestinations)
       WHERE TABID = (SELECT [TABLEID] FROM [SQLDICTIONARY] WHERE [Name] = 'BT_DPA_AOT_ReportDestinations' AND [FieldID]=0)
END
IF OBJECT_ID('DATABASE.dbo.[BT_DPA_AOT_Reports]', 'U') IS NOT NULL
BEGIN
       UPDATE SystemSequences
       SET NEXTVAL = 1 + (SELECT MAX(RecID) FROM BT_DPA_AOT_Reports)
       WHERE TABID = (SELECT [TABLEID] FROM [SQLDICTIONARY] WHERE [Name] = 'BT_DPA_AOT_Reports' AND [FieldID]=0)
END
IF OBJECT_ID('DATABASE.dbo.[BT_DPA_AOT_ReportProcesses]', 'U') IS NOT NULL
BEGIN
       UPDATE SystemSequences
       SET NEXTVAL = 1 + (SELECT MAX(RecID) FROM BT_DPA_AOT_ReportProcesses)
       WHERE TABID = (SELECT [TABLEID] FROM [SQLDICTIONARY] WHERE [Name] = 'BT_DPA_AOT_ReportProcesses' AND [FieldID]=0)
END